Borker Hoppenstedt

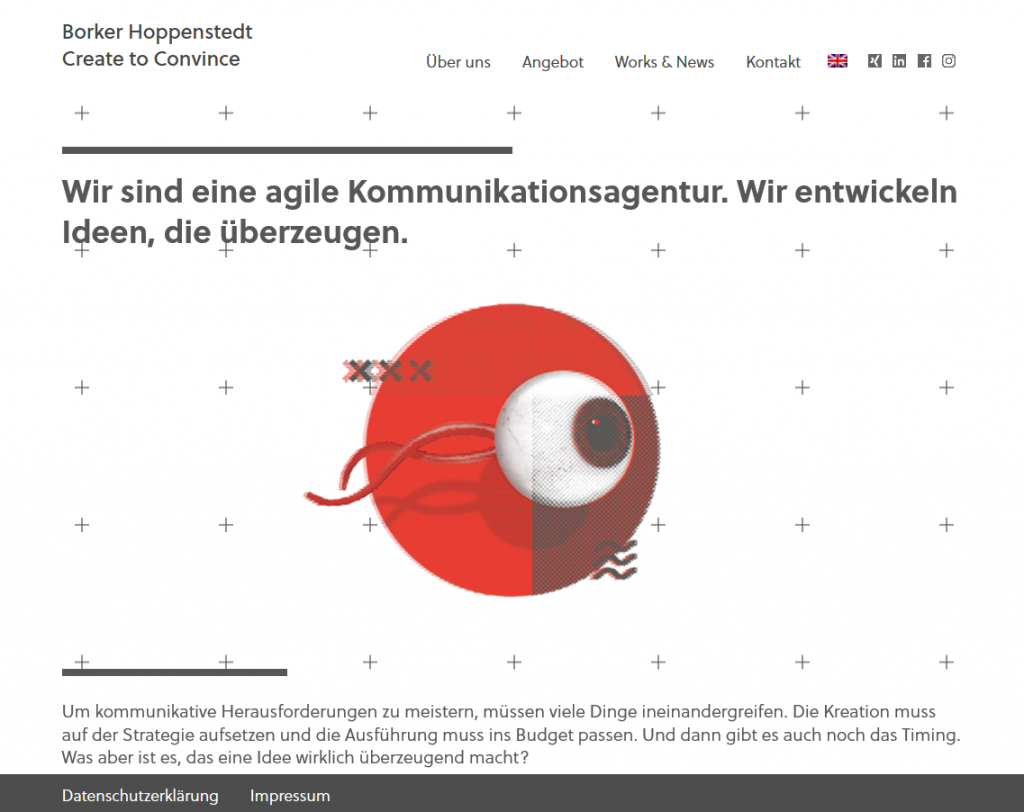
Borker Hoppenstedt, eine junge, erfolgreiche Agentur aus Berlin Neukölln hat mir den Auftrag für ihren Website Relaunch erteilt! Borker Hoppenstedt ist jetzt in neuem Gewand online: https://borkerhoppenstedt.com/

Das Design ist schick, ungewöhnlich und gewagt. Mir gefällt´s.
Die Seite ist komplett mehrsprachig programmiert und voll responsive für mobile Auflösungen.

neukoellner.net – Lokaljournalismus aus Neukölln

Mal was anderes über Zuhause lesen?

Man kann in Neukölln leben und Zeitung lesen: da kann man sich wenigstens verstecken, z.B. hinter den Seiten einer Zeit. Oder man kann auf dem Smartphone wischen.
Letzteres ist die bevorzugte Option der meisten Nutzer*innen des öffentlichen Nahverkehrs. Ein driftiger Grund für das ehrenamtliche Onlinemagazin neukoellner.net  ebenfalls die Hürde zu nehmen und auf den responsiblen Zug aufzuspringen – sprich: sich ins Zeitalter der Smartphones zu schleudern (denn zu katapultieren wäre zuviel gesagt, aber davon mehr auf Anfrage, da ich einen gewissen Hoster doch sehr unsanft titulieren würde, was ich hiermit vermeiden möchte).
Ich durfte jedenfalls ein – wie ich finde sehr gelungenes – Design von Lars Borker (mehr hier: borkerhoppenstedt.com ) für eine sehr sinnvolle WordPress-Seite umsetzen und den neukoellner völlig neu aufsetzen, ja neudeutsch zu relaunchen. Zu viel Arbeit für lau, aber hat sich trotzdem gelohnt: mir macht es Spaß in den Archiven zu stöbern und die Tags zu durchsuchen – dazu habe ich dem Blog extra eine javascript-Tag-Suche verpasst. Tippt mal rein!

Man liest sich!


neukoellner.net Seite 2
Perspektivwechsel aus Neukölln

Sesam öffne Dich!

Manchmal braucht man ein Sesam öffne Dich!

Eine Stimmerkennungssoftware, ein Fingerabdrucksensor oder die gute alte Gesichtserkennung zum Öffnen einer Eingangstür, die normalerweise sowieso offen steht, wäre wohl das, was einige Menschen als Overkill bezeichnen würden.

Daher habe ich darauf verzichtet großartige Sensoren zu verwenden. es geht darum eine Türe zu öffnen, falls sie geschlossen ist. Das soll einerseits einfach und schnell ablaufen, aber dennoch nicht jedem Zutritt verschaffen. Ein geheimes Klopfzeichen könnte die Lösung sein.

So reifte der Plan ein Piezomikrofon zu verwenden nach dem Vorbild von Grathio, der ein schönes Programm geschrieben hat, um Klopfzeichen zu erkennen. Leider erwies sich meine Hardware aber als zu unzuverlässig, so dass ich stattdessen einen kapazitativen Schalter verwendete. In der Praxis erwies sich dann aber die Idee als „Schalter“ die Türklinke zu nutzen unter den gegebenen Umständen leider als zu schwierig heraus (das Kabel zu verlegen).

So lässt sich nun der Sesam an einer geheimen Schraube öffnen. Ein Arduino beherrscht das Auslesen eines kapazitativen Schalters perfekt – mit der Hilfe einer library,

Als sehr benutzerfreundlich hat sich die Visualisierung einer Berührung des Schalters durch eine LED gezeigt – viele Nutzer benötigen ein visuelles Feedback um das Gerät bedienen zu können. Das ist natürlich eine große Sicherheitslücke und gilt es noch zu bereinigen (z.B. durch Irrlicher).

Wenn das korrekte Geheimzeichen eingegeben wurde schaltet Arduino den elektrischen Türöffner für einige Sekunden ein und man kann das Haus betreten,

Ab und zu will man dann aber doch den Zugangscode ändern. Auch daran hat Grathio bereits gedacht. Ich musste nur noch eine Speicherfunktion einbauen, damit auch nach einem Stromausfall die neue Parole erhalten bleibt (es wird in das EEPROM des Arduinos geschrieben).

Arduino Nano steuert einen Türöffner, liest einen kapatitativen Schalter aus und schaltet eine Led ein und aus.

Für das Schaltbild übernehme ich keine Gewähr, das ist nur so schnell hingeworfen (am Besten nochmal durchchecken). In der Realität habe ich nämlich noch einen Spannungsregler vor den Arduino geschaltet, damit ihm neben der Spule nichts passiert (daher auch die Freilaufdiode).

Hier der Quellcode meiner Version:

/* Detects patterns of knocks and triggers a motor to unlock
   it if the pattern is correct.
   
   By Steve Hoefer http://grathio.com
   modified by AndiGun http://andigun.de
   Version 0.1.10.20.10
   Licensed under Creative Commons Attribution-Noncommercial-Share Alike 3.0
   http://creativecommons.org/licenses/by-nc-sa/3.0/us/
   (In short: Do what you want, just be sure to include this line and the four above it, and don't sell it or use it in anything you sell without contacting me.)
   
   Analog Pin 0: Piezo speaker (connected to ground with 1M pulldown resistor)
   Digital Pin 2: Switch to enter a new code.  Short this to enter programming mode.
   Digital Pin 3: DC gear reduction motor attached to the lock. (Or a motor controller or a solenoid or other unlocking mechanisim.)
   Digital Pin 4: Red LED. 
   Digital Pin 5: Green LED. 
   
   Update: Nov 09 09: Fixed red/green LED error in the comments. Code is unchanged. 
   Update: Nov 20 09: Updated handling of programming button to make it more intuitive, give better feedback.
   Update: Jan 20 10: Removed the "pinMode(knockSensor, OUTPUT);" line since it makes no sense and doesn't do anything.
   
   Update by andigun: removed piezo speaker and using a capacitive switch instead, 
   added functionality for writing and reading EEPROM, calibration of device at startup
   
   
 */
#include <EEPROM.h>
#include <CapacitiveSensor.h>
CapacitiveSensor cs_5_6 = CapacitiveSensor(PD5,PD6); //10M Resistor between pins PD5 and PD6, you may also connect an antenna on pin 8
unsigned long csSum;
 
// Pin definitions
const int programSwitch = PD2;       // If this is high we program a new code.
const int lockMotor = PD3;           // Gear motor used to turn the lock.
const int redLED = 13;              // Status LED
const int feedBack = PD4;
 
// Tuning constants.  Could be made vars and hoooked to potentiometers for soft configuration, etc.
int threshold = 21;           // Minimum signal from the piezo to register as a knock
const int rejectValue = 25;        // If an individual knock is off by this percentage of a knock we don't unlock..
const int averageRejectValue = 15; // If the average timing of the knocks is off by this percent we don't unlock.
const int knockFadeTime = 250;     // milliseconds we allow a knock to fade before we listen for another one. (Debounce timer.)
const int lockTurnTime = 7000;      // milliseconds that we run the motor to get it to go a half turn.

const int maximumKnocks = 8;       // Maximum number of knocks to listen for.
const int knockComplete = 1200;     // Longest time to wait for a knock before we assume that it's finished.


// Variables.
int secretCode[maximumKnocks] = {50, 25, 25, 50, 100, 50, 0, 0};  // Initial setup: "Shave and a Hair Cut, two bits."
int knockReadings[maximumKnocks];   // When someone knocks this array fills with delays between knocks.
//int knockSensorValue = 0;           // Last reading of the knock sensor.
int programButtonPressed = false;   // Flag so we remember the programming button setting at the end of the cycle.

void setup() {
  pinMode(lockMotor, OUTPUT);
  pinMode(redLED, OUTPUT);
  pinMode(feedBack, OUTPUT);
//  pinMode(greenLED, OUTPUT);
  pinMode(programSwitch, INPUT);
  
  Serial.begin(9600);                     // Uncomment the Serial.bla lines for debugging.
  Serial.println("Program start.");       // but feel free to comment them out after it's working right.
  
  if ( EEPROM.read ( 0 ) != 0xff )
    for (int i = 0; i < maximumKnocks; ++i )
        secretCode [ i ] = EEPROM.read ( i );

  //triggerDoorUnlock();
  calib();
  
}

bool CSread() {
  digitalWrite(feedBack,LOW);
  long cs = cs_5_6.capacitiveSensor(10); //a: Sensor resolution is set to 10
  if (cs > threshold) {
    csSum += cs;
    if (csSum >= threshold * 10) 
    {
      if (csSum > 0) { csSum = 0; } //Reset
      cs_5_6.reset_CS_AutoCal(); //Stops readings
      digitalWrite(feedBack,HIGH);
      return true;
    }
    else return false;
  } else {
     csSum = 0; //Timeout caused by bad readings
     return false;
  }
}

void calib() {
  digitalWrite(redLED, HIGH);    
  // calibrate during the first five seconds

  while (millis() < 3000) {    
    long cs = cs_5_6.capacitiveSensor(10); //a: Sensor resolution is set to 10
    threshold = max(threshold, cs+1);
  }
  cs_5_6.reset_CS_AutoCal(); //Stops readings
  Serial.print("threshold: ");
  Serial.println(threshold);
  // signal the end of the calibration period
  digitalWrite(redLED, LOW);
}

void loop() {
  // Listen for any knock at all.
  //knockSensorValue = getVal();
  //Serial.println(knockSensorValue * (5.0 / 1023.0));
  
  if (digitalRead(programSwitch)==HIGH){  // is the program button pressed?
    if (!programButtonPressed) Serial.println("programButtonPressed");
    programButtonPressed = true;          // Yes, so lets save that state
    digitalWrite(redLED, HIGH);           // and turn on the red light too so we know we're programming.
  } else {
    if (programButtonPressed) Serial.println("programButtonReleased");
    programButtonPressed = false;
    digitalWrite(redLED, LOW);
  }

  if (CSread()){       
    listenToSecretKnock();
  }
} 

// Records the timing of knocks.
void listenToSecretKnock(){
  Serial.println("knock starting");   

  int i = 0;
  // First lets reset the listening array.
  for (i=0;i<maximumKnocks;i++){
    knockReadings[i]=0;
  }
  
  int currentKnockNumber=0;               // Incrementer for the array.
  int startTime=millis();                 // Reference for when this knock started.
  int now=millis();
  
//  digitalWrite(greenLED, LOW);            // we blink the LED for a bit as a visual indicator of the knock.
  if (programButtonPressed==true){
     digitalWrite(redLED, LOW);                         // and the red one too if we're programming a new knock.
  }
  delay(knockFadeTime);                                 // wait for this peak to fade before we listen to the next one.
//  digitalWrite(greenLED, HIGH);  
  if (programButtonPressed==true){
     digitalWrite(redLED, HIGH);                        
  }
  do {
    //listen for the next knock or wait for it to timeout. 
    //knockSensorValue = getVal();
    
    if (CSread()){                   //got another knock...
      //record the delay time.
      Serial.println("knock.");
      now=millis();
      knockReadings[currentKnockNumber] = now-startTime;
      currentKnockNumber ++;                             //increment the counter
      startTime=now;          
      // and reset our timer for the next knock
//      digitalWrite(greenLED, LOW);  
      if (programButtonPressed==true){
        digitalWrite(redLED, LOW);                       // and the red one too if we're programming a new knock.
      }
      delay(knockFadeTime);                              // again, a little delay to let the knock decay.
//      digitalWrite(greenLED, HIGH);
      if (programButtonPressed==true){
        digitalWrite(redLED, HIGH);                         
      }
    }

    now=millis();
    
    //did we timeout or run out of knocks?
  } while ((now-startTime < knockComplete) && (currentKnockNumber < maximumKnocks));
  
  //we've got our knock recorded, lets see if it's valid
  if (programButtonPressed==false){             // only if we're not in progrmaing mode.
    if (validateKnock() == true){
      triggerDoorUnlock(); 
    } else {
      Serial.println("Secret knock failed.");
//      digitalWrite(greenLED, LOW);      // We didn't unlock, so blink the red LED as visual feedback.
      for (i=0;i<6;i++){          
        digitalWrite(redLED, HIGH);
        digitalWrite(feedBack, HIGH);
        delay(100);
        digitalWrite(redLED, LOW);
        digitalWrite(feedBack, LOW);
        delay(100);
      }
//      digitalWrite(greenLED, HIGH);
    }
  } else if (currentKnockNumber >= 5) { // if we're in programming mode we still validate the lock, we just don't do anything with the lock
    validateKnock();
    // and we blink the green and red alternately to show that program is complete.
    Serial.println("New lock stored.");
    for ( int i = 0; i < maximumKnocks; ++i )
      EEPROM.write ( i, secretCode [ i ] );
    digitalWrite(redLED, LOW);
//    digitalWrite(greenLED, HIGH);
    for (i=0;i<3;i++){
      delay(100);
      digitalWrite(redLED, HIGH);
//      digitalWrite(greenLED, LOW);
      delay(100);
      digitalWrite(redLED, LOW);
//      digitalWrite(greenLED, HIGH);      
    }
  }
}


// Runs the motor (or whatever) to unlock the door.
void triggerDoorUnlock(){
  Serial.println("Door unlocked!");
  int i=0;
  
  // turn the motor on for a bit.
  digitalWrite(lockMotor, HIGH);
  digitalWrite(feedBack, HIGH);
//  digitalWrite(greenLED, HIGH);            // And the green LED too.
  
  delay (lockTurnTime);                    // Wait a bit.
  
  digitalWrite(lockMotor, LOW);            // Turn the motor off.
  digitalWrite(feedBack, LOW);
   
}

// Sees if our knock matches the secret.
// returns true if it's a good knock, false if it's not.
// todo: break it into smaller functions for readability.
boolean validateKnock(){
  int i=0;
 
  // simplest check first: Did we get the right number of knocks?
  int currentKnockCount = 0;
  int secretKnockCount = 0;
  int maxKnockInterval = 0;               // We use this later to normalize the times.
  
  for (i=0;i<maximumKnocks;i++){
    if (knockReadings[i] > 0){
      currentKnockCount++;
    }
    if (secretCode[i] > 0){           //todo: precalculate this.
      secretKnockCount++;
    }
    
    if (knockReadings[i] > maxKnockInterval){   // collect normalization data while we're looping.
      maxKnockInterval = knockReadings[i];
    }
  }
  
  // If we're recording a new knock, save the info and get out of here.
  if (programButtonPressed==true){
      for (i=0;i<maximumKnocks;i++){ // normalize the times
        secretCode[i]= map(knockReadings[i],0, maxKnockInterval, 0, 100); 
      }
      // And flash the lights in the recorded pattern to let us know it's been programmed.
//      digitalWrite(greenLED, LOW);
      digitalWrite(redLED, LOW);
      delay(1000);
//      digitalWrite(greenLED, HIGH);
      digitalWrite(redLED, HIGH);
      delay(50);
      for (i = 0; i < maximumKnocks ; i++){
//        digitalWrite(greenLED, LOW);
        digitalWrite(redLED, LOW);  
        // only turn it on if there's a delay
        if (secretCode[i] > 0){                                   
          delay( map(secretCode[i],0, 100, 0, maxKnockInterval)); // Expand the time back out to what it was.  Roughly. 
//          digitalWrite(greenLED, HIGH);
          digitalWrite(redLED, HIGH);
        }
        delay(50);
      }
    return false;   // We don't unlock the door when we are recording a new knock.
  }
  
  if (currentKnockCount != secretKnockCount){
    return false; 
  }
  
  /*  Now we compare the relative intervals of our knocks, not the absolute time between them.
      (ie: if you do the same pattern slow or fast it should still open the door.)
      This makes it less picky, which while making it less secure can also make it
      less of a pain to use if you're tempo is a little slow or fast. 
  */
  int totaltimeDifferences=0;
  int timeDiff=0;
  for (i=0;i<maximumKnocks;i++){ // Normalize the times
    knockReadings[i]= map(knockReadings[i],0, maxKnockInterval, 0, 100);      
    timeDiff = abs(knockReadings[i]-secretCode[i]);
    if (timeDiff > rejectValue){ // Individual value too far out of whack
      return false;
    }
    totaltimeDifferences += timeDiff;
  }
  // It can also fail if the whole thing is too inaccurate.
  if (totaltimeDifferences/secretKnockCount>averageRejectValue){
    return false; 
  }
  
  return true;
  
}

To be continued …

Farbtafeln mit InDesign

Manchmal geht probieren über studieren. Zum Beispiel wenn man eine neue Sonderfarbe mit Euroskala-Farben überdrucken möchte. Zwar gibt es am Bildschirm eine „Überdruck simulieren“ Funktion, jedoch ist diese nicht zuverlässig (das kann verschiedene Gründe haben, z.B. ein zu kleiner Farbraum des Bildschirms). Auch ein Digitalproof kann nur bedingt das tatsächliche Druckergebnis simulieren (auch hier kann der Farbraum zu klein sein). Sonderfarben verhalten sich manchmal im Überdruck mit anderen Farben ganz anders als erwartet (durch Rückspaltung usw.)

Es gibt also Situationen, in denen man um einen Probedruck nicht herum kommt. Praktisch wäre eine Farbtafel, die alle Nuancen der Sonderfarbe im Überdruck mit den Euroskala-Farben enthält. Solch eine Farbtafel kann man natürlich manuell mit z.B.  InDesign herstellen. Das ist aber mühsam und langweilig.

Spannender und weitaus produktiver wirds mit einem InDesign-Script. InDesign versteht zwei Scriptsprachen: AppleScript und Javascript. Ich nutze Javascript aus Gründen (vor allem, weil ich keine teuren Äpfel mag).
Das Script erzeugt ein neues Dokument und erstellt Seiten im Format 21x21cm und plaziert darauf die Testfelder. Pro Feld wird ein neues Farbfeld angelegt. Pro Sonderfarb-Abstufung muss zusätzlich ein Tint erstellt werden und das Atrribut „Fläche überdrucken“ auf das Rechteck angewendet werden.

Nach wenigen Sekunden zeigt InDesign die fertige Farbtafel an:

Farbtafel Simulation
Farbtafel Cyan/Magenta und simulierter Sonderfarbe

Das ist der Quellcode zum Erzeugen der Tafel, das Script im InDesign Scripting-Panel ablegen:

/**
 *  Farbtafeln erstellen
 *  change variables below according to your needs
 */

main();
function main (){

	// define page size in mm
	var pw = 210;
	var ph = 210;

	// define number of boxes in x and y direction
	var num_row = 21;
	var num_col = 21;
	
	var stepX = (pw-10) / num_col; // size of one box, less 5mm page margin
	var stepY = (ph-10) / num_row;

	// create document
	var doc = app.documents.add({
			documentPreferences:{
				pageHeight:ph,
				pageWidth:pw,
				facingPages:false // for simplicity don´t create facing pages
			}
	});
	var pg = doc.pages.item(0); // get the page
	
	// define initial coordinates for first box
	var x1 = stepX / 2.0;
	var y1 = stepY / 2.0;
	var x2 = x1 + stepX;
	var y2 = y1 + stepY;

	
	// define colors and paperwhite
	var cyan = 0;
	var magenta = 0;
	var yellow = 0;
	var black = 0;
	var paper = color_add (doc, "paper color ["+0+";"+0+";"+0+";"+0+"]", ColorModel.PROCESS, [0, 0, 0, 0]);
	
	// define spot color
	var special =doc.colors.add();
    special.properties = {
            name:"AndiGun Spezialtoner", 
            model:ColorModel.SPOT,
            space:ColorSpace.CMYK,
            colorValue:[0,0,100,0] // alternate color is 100% yellow
			};
			
	// define text color
	var text =doc.colors.add();
    text.properties = {
            name:"Text", 
            model:ColorModel.PROCESS,
            space:ColorSpace.CMYK,
            colorValue:[0,0,0,100] // 100% black
		};
	
	// start procedure
	for (var i = 0; i < num_col; i++) { // for each column
		for (var j = num_row-1; j >= 0; j--) { // for each row
			
			// adjust as needed
			cyan = (j*5);
			magenta = (i*5);
			//black = j*5;
			
			var color_name = "cmyk color ["+cyan+";"+magenta+";"+yellow+";"+black+"]";
            
              if (i == 0) {
                        var newTextFrame = pg.textFrames.add(); 
                        newTextFrame.contents = cyan+""; 
                        newTextFrame.textFramePreferences.verticalJustification = VerticalJustification.CENTER_ALIGN;
                        var myText = newTextFrame.parentStory.paragraphs.item(0);
                        myText.pointSize = 8;
                        myText.justification = Justification.CENTER_ALIGN;  
                        newTextFrame.geometricBounds = [0, x1 , stepY/2, x2]; // Top, Left, Bottom, Right 
              }            
          
			var color = color_add (doc, color_name, ColorModel.PROCESS, [cyan, magenta, yellow, black]);
			
			var rect = pg.rectangles.add({geometricBounds:[y1,x1,y2,x2]});
			rect.fillColor = color;
			rect.strokeWeight = 1;
			rect.strokeColor = paper;
			x1 = x2;
			x2 = x2 + stepX;
		} // end of row
		
		y1 = y2;
		y2 = y2 + stepY;
		x1 = stepX / 2.0;
		x2 = x1 + stepX;
		
	} // end of columns
	
	var tint = 0;
    x1 = stepX / 2;
	y1 = stepY / 2;
	x2 = x1 + stepX;
	y2 = y1 + stepY;    
    
	// create array of tints for special color
    var tints = Array();
       for (var i = 1; i < num_col-1; i++) {
               var specialTint = doc.tints.add (special);
               specialTint.tintValue = i * 5;
               tints[i] = specialTint;
           }
    
    for (var i = 0; i < num_col; i++) {
		for (var j = num_row-1; j >= 0; j--) {
			    
			tint = i*5;
			
            if (j == 0) {
                        var newTextFrame = pg.textFrames.add(); 
                        newTextFrame.contents = tint+""; 
                        newTextFrame.textFramePreferences.verticalJustification = VerticalJustification.CENTER_ALIGN;
                        var myText = newTextFrame.parentStory.paragraphs.item(0);
                        myText.pointSize = 8;
                        myText.justification = Justification.CENTER_ALIGN;  
                        newTextFrame.geometricBounds = [y1, x2 , y2, x2+stepX/2]; // Top, Left, Bottom, Right 
              }            
                
              if (tint > 0) { // tints have to be greater than 0
                var rect = pg.rectangles.add({geometricBounds:[y1,x1,y2,x2]});
                if (tint < 100) { 
                     rect.fillColor = tints[i];    
                     }
                 else { // with 100% it´s not a tint, it´s the actual color
                     rect.fillColor = special;    
                     }
                     
                rect.overprintFill=true; // set overprint flag
                rect.strokeWeight = 1;
                rect.strokeColor = paper;
            }
			x1 = x2;
			x2 = x2 + stepX;
            
		}
		y1 = y2;
		y2 = y2 + stepY;
		x1 = stepX / 2.0;
		x2 = x1 + stepX;
	}
	
}; // end of function main

/*
* function adds color swatch to document and returns color
*/
function color_add(myDocument, myColorName, myColorModel, myColorValue){
	
	if(myColorValue.length == 3) myColorSpace = ColorSpace.RGB;
	else myColorSpace = ColorSpace.CMYK;
	
	myColor = myDocument.colors.item(myColorName);
	myColor = myDocument.colors.add();
	myColor.properties = {name:myColorName, model:myColorModel, space:myColorSpace ,colorValue:myColorValue};
	
	return myColor;
}

GunLoop

GunLoop (work in progress) ist ein Programm zum „Musik“ machen. GunLoop sammelt Samples über ein Mikrofon und spielt sie in zufälliger Reihenfolge wieder ab. Mit der tarsosDSP-Library werden den Samples Effekte hinzugefügt oder die Geschwindigkeit verändert. Ein Oszi zeigt den produzierten Sound und den Mikrofoninput grafisch an. Das Mikrofon darf nicht Rückkoppeln und nicht die Soundausgabe neu aufnehmen, sonst kommt es zum Overkill. Es muss also entweder ein geeignetes Mirkofon verwendet werden (z.B. Gesangsmikrofon) oder die Funktion „Echolöschung“ im Soundtreiber aktiviert werden. Letztere Option bieten die meisten Soundkarten an und ist z.B. auch für die Nutzung von Skype essentiell.

Alle Samples werden im Arbeitsspeicher gehalten, damit keine Latenzen durch Festplatten Schreib- und Lesezugriffe auftreten. Nach 99 Samples wird das älteste Sample gelöscht. Da liegt der Speicherplatzbedarf bei ca. 500MB (das hängt von der Länge der einzelnen Samples ab). Bei der Verwendung von tarsosDSP muss man darauf achten keine Memory-Leaks zu erzeugen, denn wenn Ressourcen nicht korrekt geschlossen werden verbleiben große Datenmengen im Speicher und nach wenigen Minuten kommt es zum OutOfMemory-Ausnahmefehler und das Programm stürzt ab.

Ein Loop ist in 16 Schritte aufgeteilt. Aufgenommene Samples werden in jedem Durchlauf beim selben Schritt gestartet und mit zufälliger Lautstärke und Effekten abgespielt. Wenn über 30 Sekunden kein neues Sample aufgenommen wurde, wird die Anzahl der abgespielten Samples langsam gesenkt, bis es endlich wieder ruhig wird. Das Programm kann im Vollbild-Modus und oder als Fenster gestartet werden. Mit Klick auf GunLoop->Window bzw. GunLoop->Fullscreen wird die Einstellung gespeichert. Mit GunLoop->Save können die erzeugten Samples als Wav-Dateien gespeichert werden – mit File->Load können alte Samples geladen werden. Die Funktion lädt die Samples an die ursprünglichen Positionen (Steps). Die Option GunLoop->AutoLoader lädt die 99 neusten Samples aus dem zuletzt verwendeten Ordner. Mit dem Menüpunkt GunLoop->Choose input kann die zu benutzende Audioline ausgewählt werden. Das Dialogfenster öffnet sich außerdem automatisch beim ersten Start und speichert die Auswahl ab.

GunLoop in Aktion, in echt hakt´s ein bisschen weniger

Soundbeispiel:

Sourcecode:

public void play(double startTime) {
	if(state == PlayerState.NO_FILE_LOADED || buffer == null){
		throw new IllegalStateException("Can not play when no file is loaded");
	} 
	else {		
		try {
			gainProcessor = null;
			gainProcessor = new GainProcessor(gain);
			if (audioPlayer == null) audioPlayer = new AudioPlayer(format);
			int len = buffer.length;
			dispatcher = null;
			dispatcher = AudioDispatcherFactory.fromByteArray(buffer, format, len, len/2);
			RateTransposer rateTransposer = null;
			rateTransposer = new RateTransposer(tempo);
			dispatcher.addAudioProcessor(rateTransposer);
			dispatcher.setZeroPadFirstBuffer(true);
			dispatcher.setZeroPadLastBuffer(true);
			dispatcher.skip(startTime);
			dispatcher.addAudioProcessor(this);
			dispatcher.addAudioProcessor(beforeWSOLAProcessor);
			flangerEffect = new FlangerEffect(defaultLength/1000.0,defaultImpact/100.0,format.getSampleRate(),defaultFrequency/10.0);
			dispatcher.addAudioProcessor(flangerEffect);
			dispatcher.addAudioProcessor(gainProcessor);
			dispatcher.addAudioProcessor(loopAudioProcessor);
			dispatcher.addAudioProcessor(audioPlayer);
			Thread playThread = new Thread(dispatcher,System.currentTimeMillis()+"_GunLoop");
			playThread.start();
			setState(PlayerState.PLAYING);
		} catch (UnsupportedAudioFileException e) {
			throw new Error(e);
		} catch (LineUnavailableException e) {
			throw new Error(e);
		}
	}
}

Update:

Durch einen Programmierfehler konnte das Fenster nicht öffnen. Das Programm hat nur auf meinem Rechner funktioniert, weil ich eine gunLoop.conf-Datei schon mit einer älteren Version gespeichert hatte. War die Datei nicht vorhanden ist das Programm abgestürzt, bevor sich das Fenster öffnen konnte. Ganz böse!

Download:

Lade eine aktuelle Kopie des Programmes herunter: GunLoop.jar